Category: Windows

Does VMware Workstation Pro 15.5 run on Windows 11???

As Microsoft stopped selling Windows 10 licenses & Windows 11 has been out for quite a while now I thought I’d give it a try. First questions that came to mind were does everything I need for work actually work there and what do I need to change.. As VMware itself states that Workstation 15.5 on Windows 11 isn’t a supported setup I still thought I’d give it a try before getting the upgrade.

So here’s what you can expect from this setup (or how it was for me). It somewhat worked.. :

  • Some VM-s required “VM hardware upgrade”
  • None of the VM-s with more than 1 CPU/Core would even start – threw errors & refused to start until extra cores removed
  • 3D acceleration issues inside VM-s when needing to use GUI (Gnome/KDE,etc)- GUI worked, but image sometimes was blurry/sometimes resolution issues when resizing VM Window, etc.
  • Suspend VM button instantly crashes/shuts the VM down.

So if you don’t need multi core VM-s with/3d acceleration or pause(standby) functionality, then it might work for you.. But I’d just recommend skipping this trial and error phase if your not just curious & bored.. and just upgrade to 17.

Couldn’t create partition or locate an existing one in Windows 10

Over the weekend when my Windows 10 decided to completely go nuts. Ok it was my fault, as it happened after some exploitation attempts. But during the re-install I ran into a small issue. When trying to re-install on my NVME drive the setup kept stating that “Couldn’t create partition or locate an existing one in Windows 10“.

In regards to that error there were some hints out there about using diskpart to clean/”resetting the disk” which I didn’t want to do, as I had things I wanted to keep on other partitions.

Fortunately I got away with only deleting the all the Windows related partitions on that disk. Namely I deleted the windows partition itself & 2 recovery related partitions – so all I had left was the data partition. After doing that my windows installer stopped throwing that error and went on without any issues.

Windows 10 WiFi ignoring DHCP DNS settings

After a long period of home office it seemed that my computer did not want to work well in any other WiFi network any more. It showed “no internet connection” in every other network.

When looking into the connection settings, I saw that it was still showing my home DNS server in the settings. No matter what network I was connecting to, be it my phones hot spot, etc still the same.
Example output of the netsh command:

C:\WINDOWS\system32>netsh interface ipv4 show config name=”Wi-Fi”

Configuration for interface "Wi-Fi"
DHCP enabled: Yes
IP Address: 10.1.0.38
Subnet Prefix: 10.1.0.0/24 (mask 255.255.255.0)
Default Gateway: 10.1.0.1
Gateway Metric: 0
InterfaceMetric: 70
DNS servers configured through DHCP: 172.31.1.1
Register with which suffix: Primary only
WINS servers configured through DHCP: None

So I tried using the “netsh” command to reset it by entering a static DNS:
netsh interface ipv4 set dnsservers name="Wi-Fi" source=static address=8.8.8.8

Now I had working name resolution, but this is not a fix for me to have to set a correct DNS server for all the networks I go to, so I set it to DHCP settings again.
netsh interface ipv4 set dnsservers name="Wi-Fi" source=dhcp

Name resolution broke again, as the “show config” returned my home DNS again.. So I turned to the Windows registry to find where that IP address exists. Find yielded the following result. In Computer\HKEY_LOCAL_MACHINE\SYSTEM\ControlSet001\Services\Tcpip\Parameters\Interfaces\{interface-uid} there was a registry key called ProfileNameServer. It had a value that matched my problematic DNS server entry. After deleting registry key and reconnecting to the WiFi I finally saw that the DHCP given DNS server list was being used and network connection was working normally again.

Windows search keeps crashing

After updating Windows 10 to version 1903 I started having strange Issues where the search functionality stopped working. By search stopped working I mean you open start and start typing and nothing happens..

When it happened for the first time I just rebooted my PC and all worked fine for a few days. When it happened again I just killed the search process in task manager and all worked fine again for a few days.

As it started happening more often I ended up trying to fix it. For me rebuilding the Windows search indexes and the issue went away. So in order to rebuild the indexes you need to do the following.

Click on start and press on settings. From there navigate to “Search” -> Searching Windows. And in the open page click “Advanced Search Indexer Settings”. After that the following Window should pop up:

From there click on “Advanced” and in the following Window find the “Rebuild” button in the troubleshooting sector. Press that and agree to the warning that rebuilding might take some time.

Or if Your search is working a the moment just type “Indexing Options” into your search window and you arrive at the previously shown Window.

Well and if the steps above didn’t help might as well read Microsoft’s support article: https://support.microsoft.com/en-us/help/4520146/fix-problems-in-windows-search

Remote Desktop “No Valid Certificates Were Found on This Smart Card” when trying to authenticate with National ID-Card

When trying to use smart-cards/tokens to authenticate to Remote Desktop you can receive the “No Valid Certificates Were Found on This Smart Card” error for multiple reasons. It can be that you don’t have the necessary drivers installed properly. It also can be that the CA trust chain is not in place. In this post I’m not going into detail on those issues. Here it’s just going to be a quick fix for the Estonian National ID-Card not showing up in Remote Desktop. It can also apply for other ID-Cards.

Namely the issue is that national ID-Cards tend not to have the “Smart Card Logon” key usage in their certificate profiles and that’s why they aren’t showing up in Windows Remote Desktop. So if the certificate you have on your smart-card doesn’t have “Smart Card Logon” set it won’t show up either. There is a quick work around/fix for it. You just need to modify one registry setting so that Windows would accept also certificates with out the specific permissions set.

Just copy paste this into notepad and save it with the .reg extension and execute it:
Windows Registry Editor Version 5.00

[HKEY_LOCAL_MACHINE\SOFTWARE\Policies\Microsoft\Windows\SmartCardCredentialProvider]
“AllowCertificatesWithNoEKU”=dword:00000001
“EnumerateECCCerts”=dword:00000001

Windows will give you a warning, just accept it and then it should say that the keys were successfully added to the registry. Now your ID-card certificates should show up in Remote Desktop.

Installing VMware Workstation 15 Pro on Windows 10 1903 can have a small installer issue

After updating my Windows 10 to 1903 VMware Workstation 14 stopped working. It is a known issue since the release of 1903. VMware hasn’t released a patch for it and the Windows updater points to and seems to be promoting upgrading to version 15. Although there are many workaround hints available, I for one do not want to mess about with uninstalling and blocking some windows update packages. So I went ahead and got the upgrade license and went on to update it. That didn’t go as smooth as I would have expected.

As it turns out the installer for VMware Workstation 15 Pro(VMware-workstation-full-15.5.0-14665864.exe) in my case had a small issue where it wouldn’t install. When running the installer it always prompted me that “In order to finish installing VC redist”, I need to reboot my computer. Well did that the first time the installer asked me to press “Yes” and reboot, after that the message still came up, tried it one more time and then it still persisted. After that I just went ahead and downloaded vc_redist.x64.exe via Microsoft’s support site and installed it manually. After doing that Workstation installer worked like a charm and had no more issues.

Windows Offline files not syncing in Windows 10

Usually I don’t have that many issues with Windows 10, but somehow after last Windows update I lost control over the contents of the “Documents” folder which was being synced with a file server. I was able to add files but never delete them getting the error “Permission Denied”. Talked to the domain admin, he looked over the permissions on the file server and all seemed fine there. Reset the offline file sync cache, etc (the usual hints you get while googling resetting offline files sync issues) got me back permissions on my files, or so I thought.. After leaving the office I noticed in the evening that I have no more Documents at all. It turned out that after the reset Offline files were not syncing at all and I was able to access them only when I had connectivity to the file server. The issue was that offline files were in “sync pending state” and it wouldn’t actually start the sync.

Try the classics “reboot” the computer, no the sync would not start again, try resetting the offline files cache again – no success.. What actually worked for me was running:

gpupdate /force

After re-installing the group policy clicked on the sync offline files button and voila it synced like a charm again.

Windows 10 CPU speed not down clocking like it should / Intel speedstep issue and fix

On my Lenovo T480 I ran in to a nice issue where the fan was constantly blowing and CPU was always over 4 GHz never clocking it self down. In Windows power management, it was set to balanced as it should, changing between power plans had no effect, always CPU at max speed. When I started googling about the issue I ran into different forum threads describing the same issue with people saying that Windows Power Management setting sometimes get corrupted and that the only fix they found is a re-install of Windows which for me was an unacceptable solution…

What actually helped me get around the issue was when i changed the CPU minimum and maximum speeds in power management. Basically I changed the minimum to 1% instead of 5 and max to 90%, applied the settings noticed the CPU clocked down instantly to 0,89 GHz like it was supposed to be, then reset the “Balanced power plan” back to it’s default settings and now the CPU speeds are as they should be 0,89 GHz while idling and over 4 GHz when under load.

For those who need more exact directions here is the step by step:

  • Open up the “Start menu” by pressing the Windows key and type Edit Power Plan and press enter/or just double click it with the mouse.
  • Click on “Change advanced power settings
  • Go to the “Processor Power Management” subsection and from there on move to “Minimum Processor State” change the values for both “On battery” and “Plugged in” from their default value of 5% to 1%.
  • Next change the “Maximum Processor State” values for “On battery” and “Plugged in” from their default value of 100% to 90%.
  • Click “Apply” to apply the changed power plan.
  • After applying the altered power plan click on “Restore Plan Defaults” and “Yes” in the prompt that pops up warning you that the power plan settings will be reverted to their default values. And then click “Apply” as the final thing.

And that should be it,  now your computer should be changing its CPU speed based on real needs.

Windows 10 Media Creation Tool error 0x80004005 fix

When trying to create a Windows 10 USB installation disk you may get errors starting with code 0x80004005 and end up scratching your head, that why isn’t it working. When I happened to get that error, what helped me get around it was basically emptying the windows update cache by doing the following:

  • Open command prompt in administrator rights
    Click on the start menu button and type cmd. A best match of "Command Prompt" will appear, right click on it and select run as administrator.
  • Using the previously opened Command Prompt stop the “Windows Update service” by typing the following:
    net stop wuauser
  • If your computer is a part of a Windows Domain, it might not have “Windows Updare service” running but rather have “Update Orchestrator Service” instead running, then you need to stop that by typing the following:
    net stop "Update Orchestrator Service"
  • Next you need to stop the Cryptographic and Background Intelligent Transfer services, by typing the following commands:
    net stop bits
    net stop cryptsvc
  • Now lets just rename some of the folders used by Windows Update so, it would re-create them, by typing:
    ren %systemroot%\System32\Catroot2 Catroot2.old
    
    ren %systemroot%\SoftwareDistribution SoftwareDistribution.old
    
    
  • Now lets start the services back up again that we previously stopped by typing:
    net start wuauser
    
    net start bits
    
    net start cryptsvc
    
    # and if necessary also update orchestrator service
    
    net start "Update Orchestrator Service"
  • And thats it close the Command Prompt and retry creating your Windows 10 installation media.

If your are getting “Access is denied” on the “ren %systemroot%\SoftwareDistribution SoftwareDistribution.old” command and you haven’t stopped the “Update Orchestrator Service”, try stopping that.


Safer SSH key usage on Windows than just using Putty pageant

This is the first a follow up post describing a work around on Windows to the issue described in my previous post describing the issue with SSH keys being re-usable by anyone with privileged access on the SSH server. (Read more). Basically the workaround is to use KeePass and it’s plugin called KeeAgent instead of using putty’s pageant to present the SSH key to Putty.

Pre-requisites

  • Putty installed on your computer
  • A SSH private key in Putty format(.ppk) and the public key set on the SSH server authorized keys file.

Getting Ready

As mentioned previously we will be using the password manager called KeePass and it’s plugin called KeeAgent to store and present the SSH private key to putty. So lets get started.

  1. KeePass can be found at  https://keepass.info/ you need to download version 2.xx (current version is 2.38) and install it.
  2. Install KeeAgent plugin which can be found at https://lechnology.com/software/keeagent/, download it and unzip the file called KeeAgent.plgx to KeePass plugins dir (C:\Program Files (x86)\KeePass Password Safe 2\Plugins)
  3. Start KeePass

Using KeePass and KeeAgent for handling the SSH keys

  1. Create new password database and set the password you want.
  2. Add a new password entry to the password database to do that in the menu go to “Edit -> Add New Entry” or just press the new entry button.
  3. Whilst creating the new password entry set the password in the entry to be the same as it is on your .ppk file
  4. Go to the Advanced tab and in the Attachments section attach your .ppk file
  5. Go to the KeeAgent tab, tick the box allowing KeeAgent to use this entry. After that tick the box “use confirm constraint”.  Set the private key location to attachment and select the previously attached file. If the password has been set correctly and the attachment is a valid .ppk file it should show public key info below.
  6. Next navigate in the menu to Tools -> KeeAgent and click on it. In the window that opened click on “Add..” , select “From KeePass..” and select the previously imported key. Verify that the require confirmation box is ticked and click ok.
  7. Now open up Putty and try connecting to some SSH server where your key should work.

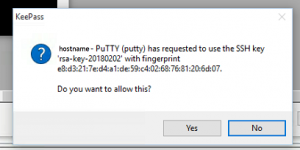
If all is working as it is supposed to the following prompt should pop up asking for permission on the private key usage every time it is being accessed by a new session:

KeeAgent-Prompt

The prompt will show the hostname where the key is being accessed and the key description (name and fingerprint).