Month: February 2018

802.1x Authentication on Cisco Catalyst switches

If any one is wondering how to configure 802.1x authentication on Cisco switches, here is a little list of commands that should help you. I am not going to cover the hassle of configuring NPS service on Windows domain server at the moment, but maybe later on if I get the time for it.

Basics of what you need to do

  1. Configure the radius servers on the switch
  2. Set the switches authentication mode to aaa new-model and configure aaa authentication it self
  3. Configure the VLANS you want to use (not going to cover creating a VLAN here..)
  4. Configure the ports you want the authentication to be required on

The configuration

So lets start configuring the switch (using the command line interface). First log in to the switch a. (I seriously hope you are using SSH not telnet..)

Configuring the radius servers

You should replace the IP addresses ports and passwords to match the ones you are going to use. PS password will be in plain text in the configuration unless you have service password encryption turned on. I am configuring the switch to use 2 radius servers, since its always a good idea to have more than one of them.. In case one fails the switch will try the other one to authenticate the user.

radius server name-of-first-server
 address ipv4 10.0.0.101 auth-port 1812 acct-port 1813  
 key  YourRadiusPasswordHere

radius server name-of-second-server
 address ipv4 10.0.0.102 auth-port 1812 acct-port 1813
 key  YourRadiusPasswordHere
aaa new-model 
aaa group server radius MyRadiusServers
 server name name-of-first-server
 server name name-of-second-server

Enabling authentication

Set the user authentication service to use your previously configured radius group radius servers

aaa authentication dot1x default group MyRadiusServers
aaa authorization network default group MyRadiusServers

Enabling user authentication on the ports

After configuring the radius part on the switch it’s time to enable authentication on the ports you want. As an example I enabled them on ports 1-12 leaving the others alone.

interface range gi1/0/1-12
switchport access vlan 5
switchport mode access
authentication event fail action authorize vlan 2
authentication event no-response action authorize vlan 2
authentication port-control auto
dot1x pae authenticator
dot1x timeout tx-period 2

The “switchport access vlan” command sets the VLAN that the user will be put in to incase of a successful authentication, in the case of this example it’s vlan 500.  In other words, it sets the ports default vlan.
The commands starting with “authentication event” set the VLAN where the user ends up in case of authentication failure.
Dot1x timeout it’s not a mandatory command, but a nice thing to set if you want to use authentication fail to send people to some guest network. The thing what I noticed was that the clients that don’t authenticate them selves some times ended up with the auto configure addresses – windows just gave up on trying to get access to the network, when this time out was not set.
Safer SSH key usage on Windows than just using Putty pageant

This is the first a follow up post describing a work around on Windows to the issue described in my previous post describing the issue with SSH keys being re-usable by anyone with privileged access on the SSH server. (Read more). Basically the workaround is to use KeePass and it’s plugin called KeeAgent instead of using putty’s pageant to present the SSH key to Putty.

Pre-requisites

  • Putty installed on your computer
  • A SSH private key in Putty format(.ppk) and the public key set on the SSH server authorized keys file.

Getting Ready

As mentioned previously we will be using the password manager called KeePass and it’s plugin called KeeAgent to store and present the SSH private key to putty. So lets get started.

  1. KeePass can be found at  https://keepass.info/ you need to download version 2.xx (current version is 2.38) and install it.
  2. Install KeeAgent plugin which can be found at https://lechnology.com/software/keeagent/, download it and unzip the file called KeeAgent.plgx to KeePass plugins dir (C:\Program Files (x86)\KeePass Password Safe 2\Plugins)
  3. Start KeePass

Using KeePass and KeeAgent for handling the SSH keys

  1. Create new password database and set the password you want.
  2. Add a new password entry to the password database to do that in the menu go to “Edit -> Add New Entry” or just press the new entry button.
  3. Whilst creating the new password entry set the password in the entry to be the same as it is on your .ppk file
  4. Go to the Advanced tab and in the Attachments section attach your .ppk file
  5. Go to the KeeAgent tab, tick the box allowing KeeAgent to use this entry. After that tick the box “use confirm constraint”.  Set the private key location to attachment and select the previously attached file. If the password has been set correctly and the attachment is a valid .ppk file it should show public key info below.
  6. Next navigate in the menu to Tools -> KeeAgent and click on it. In the window that opened click on “Add..” , select “From KeePass..” and select the previously imported key. Verify that the require confirmation box is ticked and click ok.
  7. Now open up Putty and try connecting to some SSH server where your key should work.

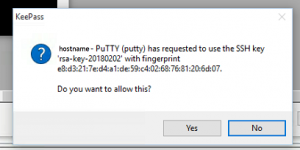
If all is working as it is supposed to the following prompt should pop up asking for permission on the private key usage every time it is being accessed by a new session:

KeeAgent-Prompt

The prompt will show the hostname where the key is being accessed and the key description (name and fingerprint).

R77 database revision control unspecified error

It is always a good idea to have database revision control on just in case. But keep in mind that the comment field in it doesn’t support all sorts of characters. As it turns out using commas (“,”) inside comments are illegal and ends up with the revision creation failing and SmartDashboard client giving you an “unspecified error” message. Just remove the comma or any other “strange symbol” from it and it works fine. In other words remember to keep the comments short and simple, with out special characters..

SSH key based authentication secure and convenient or is it?

SSH key based authentication secure and convenient or is it? Well that seems really obvious that it is secure and convenient no passwords to be guessed and changed all the time, or that can be guessed logging on to servers much faster. But when done improperly it isn’t that safe and secure as it would seem.

The issue

When logging on to SSH servers using authentication agent forwarding for convenience so you could jump hosts using the same key. See nothing wrong with it?  Still seems all good and  secure? Well not that secure any more, as soon as convenience of the authentication agent forwarding comes to play a little issue arrises that a lot of people do not think about. Namely the key you used to authenticate to the server is now accessible to others on the server, not in the sense that they could copy it, but they can use it to authenticate to other servers where your key would be valid and that are accessible from that server. Although it requires escalated privileges to get access to it, it is still a problem. So where is this key located? It goes to the /tmp/ folder. As the following is an example from my test machine:

huxx@lnx:~# ls -la /tmp/

total 10

drwxrwxrwt 10 root     root     3072 Feb  1 01:00 .

drwxr-xr-x 23 root     root     4096 Jun  2  2015 ..

drwx------  2 huxx     huxx     1024 Feb  1 00:36 ssh-DhNiAzWTEV
huxx@lnx:~# ls -la /tmp/ssh-DhNiAzWTEV

total 4

drwx------  2 huxx huxx 1024 Feb  1 00:36 .

drwxrwxrwt 10 root root 3072 Feb  1 01:01 ..

srwxr-xr-x  1 huxx huxx    0 Feb  1 00:36 agent.18922

Is there a solution for it?

So is there a solution for the afore mentioned issue? Well luckily  Yes there is. There are SSH key agents out there that actually ask for your permission first before allowing access to the private key. For Windows one such solution would be to use the KeeAgent plugin for the password manager called KeePass it allows to set a password/confirmation to be prompted for every time someone/something tries to access the private key. The same combination will also work on macOS with a bit of work by porting the Windows application using mono for Mac and adding ssh-askpass script to the system. The exact solutions will be shown in followup posts to come.

Edit:
Solution for Windows users described here: https://www.huxxit.com/index.php/2018/02/02/safer-ssh-key-usage-windows-just-using-putty-pageant/