This is the first a follow up post describing a work around on Windows to the issue described in my previous post describing the issue with SSH keys being re-usable by anyone with privileged access on the SSH server. (Read more). Basically the workaround is to use KeePass and it’s plugin called KeeAgent instead of using putty’s pageant to present the SSH key to Putty.
Pre-requisites
- Putty installed on your computer
- A SSH private key in Putty format(.ppk) and the public key set on the SSH server authorized keys file.
Getting Ready
As mentioned previously we will be using the password manager called KeePass and it’s plugin called KeeAgent to store and present the SSH private key to putty. So lets get started.
- KeePass can be found at https://keepass.info/ you need to download version 2.xx (current version is 2.38) and install it.
- Install KeeAgent plugin which can be found at https://lechnology.com/software/keeagent/, download it and unzip the file called KeeAgent.plgx to KeePass plugins dir (C:\Program Files (x86)\KeePass Password Safe 2\Plugins)
- Start KeePass
Using KeePass and KeeAgent for handling the SSH keys
- Create new password database and set the password you want.
- Add a new password entry to the password database to do that in the menu go to “Edit -> Add New Entry” or just press the new entry button.
- Whilst creating the new password entry set the password in the entry to be the same as it is on your .ppk file
- Go to the Advanced tab and in the Attachments section attach your .ppk file
- Go to the KeeAgent tab, tick the box allowing KeeAgent to use this entry. After that tick the box “use confirm constraint”. Set the private key location to attachment and select the previously attached file. If the password has been set correctly and the attachment is a valid .ppk file it should show public key info below.
- Next navigate in the menu to Tools -> KeeAgent and click on it. In the window that opened click on “Add..” , select “From KeePass..” and select the previously imported key. Verify that the require confirmation box is ticked and click ok.
- Now open up Putty and try connecting to some SSH server where your key should work.
If all is working as it is supposed to the following prompt should pop up asking for permission on the private key usage every time it is being accessed by a new session:
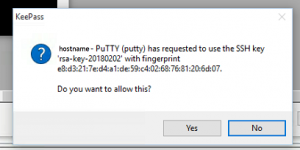
The prompt will show the hostname where the key is being accessed and the key description (name and fingerprint).
October 8, 2018 at 16:32
But does the use of KeeAgent itself prevent a user taking advantage of agent forwarding ?
We use KeeAgent because it first requires me to decrypt the KeePass database, and only I know the passphrase.
Our server have their SSH services configured to prevent agent forwarding. I wasn’t aware this had any dependency on the end-point SSH client. i,e, I didn’t think it made any difference how the private key was made available during the initial SSH authentication process. I’ll be interested to know more on this – thanks 🙂
October 20, 2018 at 15:12
Hi, and sorry for the late reply..
KeeAgent it self doesn’t block agent forwarding but is used rather to make it more secure in the sense that you retain control of the key, when it can be used (It always asks permission upon some application accessing the key – ofcourse only if the prompt feature is turned on). So i guess it just is meant to make life a bit more secure and easy I guess.